Blog Update!
For those of you not following me on Facebook, as of the Summer of 2019 I've moved to Central WA, to a tiny mountain town of less than 1,000 people.

I will be covering my exploits here in the Cascades, as I try to further reduce my impact on the environment. With the same attitude, just at a higher altitude!
Showing posts with label handmade. Show all posts

Sunday, December 5, 2010

Caramel covered homemade marshmallows

Williams Sonoma versionFollowing the theme of recreating Williams Sonoma food gift ideas, I wanted to share with you another knock-off. It's the caramel covered marshmallow treat. Also called Modjeskas, these candies were purportedly named after a beautiful Polish actress by an admirer.

Anyway, they look a heck of a lot more complicated to make than they actually are. These make great gifts wrapped in wax paper. Especially when you aren't paying $27 a pound for them!

To make the marshmallows:

Ingredients
1 cup confectioners' sugar
2 tablespoons plus 2 1/2 teaspoons unflavored gelatin
1/2 cup cold water
2 cups granulated sugar
1/2 cup light corn syrup
1/2 cup hot water (about 115 degrees)
1/4 teaspoon salt
2 large egg whites
1 teaspoon vanilla

Directions
Oil bottom and sides of a 13 by 9 by 2-inch rectangular metal baking pan and dust bottom and sides with some confectioners' sugar.

In bowl of standing electric mixer, sprinkle gelatin over cold water and let stand to soften.

In a 3-quart heavy saucepan cook granulated sugar, corn syrup, hot water, and salt over low heat, stirring with a wooden spoon, until sugar is dissolved. Increase heat to moderate and boil mixture, without stirring, until a candy or digital thermometer registers 240 degrees, about 12 minutes. Remove pan from heat and pour sugar mixture over gelatin mixture, stirring until gelatin is dissolved.

With standing mixer beat on high speed until white, thick and nearly tripled in volume, about 6 minutes. In a large bowl with cleaned beaters beat whites (or reconstituted powdered whites) until they just hold stiff peaks. Beat whites and vanilla into sugar mixture until just combined. Pour mixture into baking pan and sift 1/4 cup confectioners' sugar evenly over top. Chill marshmallow, uncovered, until firm, at least three hours, and up to 1 day.

Run a thin knife around edges of pan and invert pan onto large cutting board. Lifting up 1 corner of inverted pan, with fingers loosen marshmallow and let drop onto cutting board. With a large knife trim edges of marshmallow and cut marshmallows into roughly 1-inch cubes. Sift remaining confectioners' sugar into a large bowl and add marshmallows in batches, tossing to evenly coat. Marshmallows (without caramel) keep in an airtight container at cool room temperature for 1 week.

To make the caramel:

Ingredients
1 cup sugar
1 cup light corn syrup
1/2 cup cream
1/4 cup water
1 tbsp butter
1 tsp vanilla extract
1/8 tsp salt
16 marshmallows (see recipe above)
Wax paper

Directions
Cut the wax paper into 2 inch x 3 inch wide strips. You may need to adjust the size of your wax paper depending on how big your marshmallows are.

Place the sugar, water, cream, and corn syrup in a small saucepan over medium heat, stirring constantly until the sugar dissolves. Stir in the butter until it is melted. Continue to cook, stirring occasionally until the caramel reaches 238 degrees, then remove from the heat.

Stir in the vanilla and salt. Allow the caramel to thicken and cool for 10-15 minutes until it cools to about 175 degrees.

To dip the marshmallows:

Using a fork, drop a marshmallow into the caramel and turn it over until it is completely covered. Remove the marshmallow from the caramel, letting excess caramel drip off. Place the marshmallow on a piece of wax paper.

Continue dipping with the remaining marshmallows. If the caramel becomes too stiff, place it over the heat for a minute or two until it becomes easy to work with.

Allow the candies to set fully at room temperature before wrapping. Store excess candies in an airtight container at room temperature.

Related posts:
Chocolate peppermint bark
Holiday gift basket
White chocolate raspberry jam

Friday, December 3, 2010

Chocolate covered candied orange peels

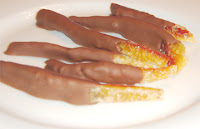
Chocolate dipped candied orange peelsI wrote up this recipe almost three years ago and made some for holiday presents and I still have people asking me to make some more. I better get on it this year...

You can modify this recipe to make more or less. This year, since I'm all about non-toxic ingredients, I've edited it a tad, but if you can't find organic chocolate or sugar to your liking then do what you can.

Ingredients:
Peels from 5 medium size organic oranges
4 cups granulated organic sugar
2.5 cups filtered water
6 oz organic, fair trade chocolate (milk or dark or white or mix it up)

The process is fairly easy.

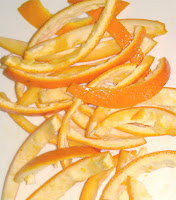
Step 1. Scrape the inside of the orange peels to remove the residual orange from the pith. If the pith is really thick, scrape it out with a vegetable peeler or a knife.

Step 1

Step 2. Cut the peels into strips about 1/4" in width, removing the parts where the stem and the orange end are and any parts that don't look good.

Step 2

Step 3. Put the strips into a medium sauce pan and cover with cold water. Bring the water to a boil to blanch the peels. This helps remove the bitterness of the pith. Repeat the blanching process one more time (if you removed a lot of the pith) or two more times if you left a lot of the pith on (like I did).

Step 3

Step 4. Drain the peels and rinse with cold water. In the same saucepan add the water and sugar and bring to a boil. It will start to boil somewhere around 210 degrees F.

Step 4

Step 5. Once the sugar syrup is boiling, add the peels and bring the temperature back up to boiling. Simmer the peels on medium low until they become translucent. Depending on how much pith is on the peel this will take anywhere from 1/2 an hour to 1 hour and 15 minutes (this is how long it took mine).

Step 5

Step 6. When the peels are looking translucent, use a pair of tongs and remove them from the pot, placing them on a rack set over a cookie sheet to catch the drips. If you want you can roll the freshly removed strips in additional sugar but I found this to be a huge mess.

[You can strain the sugar syrup and use it as a simple syrup in a variety of recipes - just make sure you refrigerate it.]

Step 6

Step 7. Leave the peels out to dry. If you want to speed things up you can put the whole cookie tray/rack combo in the oven at 250 degrees F for an hour or two (just skip the non-stick!).

Step 8. If you want to dip the strips in chocolate, melt the chocolate over a double boiler and dip, laying the strips down on parchment paper to dry.

Step 8

Thursday, December 2, 2010

Candy cane themed holiday gift ideas

Here is a repost of a few easy to make homemade holiday gift giving ideas. I've included one food item and one beauty care item in case you prefer one or both!

Layered peppermint barkI suspect I'm not the only one being bombarded by Williams Sonoma and Crate and Barrel catalogs all sporting delicious tins of chocolate peppermint bark. I've had the stuff from Williams Sonoma and it's mighty tasty, but for about $30 a pound, I knew I could do much better (Crate and Barrel's is something like $15 for 14 ounces).

So, even with using high quality Callebaut chocolate (on sale this week in the Seattle area at Town and Country Markets for $4.99 a pound) it's much, much cheaper to make it yourself.

Peppermint Bark

Ingredients

16 ounces bittersweet or semisweet chocolate, chopped
12 ounces high quality white chocolate, chopped
6 candy canes, coarsely crushed (about 6 ounces)
1/2 teaspoon peppermint extract

Instructions
Line a large cookie sheet with parchment paper or foil.

Melt bittersweet chocolate in double boiler until it is melted and smooth. Stir in peppermint extract. Cool to barely lukewarm, about 5 minutes. Pour bittersweet chocolate mixture onto cookie sheet. Using a spatula, spread the chocolate so that it is about 1/4 inch thick. Chill for about 15 minutes or until it is set.

Meanwhile, melt the white chocolate in a double boiler until it is melted and smooth. Cool until it is barely lukewarm (about 5 minutes). Pour the white chocolate onto the cooled bittersweet chocolate, using a spatula to spread out the chocolate to cover the first layer evenly.

Immediately sprinkle top layer with crushed candy canes. Let it sit for about 10 minutes and then chill just until firm, about 20 minutes. It can be broken apart or cut into rectangles. Store in an airtight container in a cool place or freeze. Allow it to come to room temperature before serving.

You can pack the bark in glass jars that are decorated with red ribbon and candy canes for a sweet touch.

Candy Cane Sugar Scrub

Crushed candy canes are really just sugar right? So, why not add them to a sugar scrub to make a super festive beauty treat?

Ingredients
1 cup granulated white sugar
6 candy canes, finely crushed almost into a powder
1/2 cup sweet almond oil (or olive oil)
1/2 teaspoon vitamin E oil (optional - used as a preservative)
1 teaspoon cocoa butter (optional)
6 drops peppermint essential oil

Instructions
Mix all ingredients until well blended. Place into a clean glass jar with a tight lid and add a fancy label. I highly recommend the 1/2 pint wide mouth canning jars and wide mouth plastic storage lids.

Wednesday, December 1, 2010

Shaving gift set giveaway

A mom friend of mine, Anne, from our kids' school is also the owner and mastermind behind Seattle Sundries, where she sells soaps with the most unique names and designs. An immense amount of thought goes into all of her products and their ingredients and it definitely shows.

For the upcoming holidays, Anne offered to have me host a giveaway of one of her Men's Shaving Sets. This would make a great holiday gift for the man (or even woman!) in your life. From her website:
Seattle Sundries' soap is GREAT for shaving... smooth with creamy lather. The shaving set comes with a black ceramic shaving mug, a badger hair shaving brush with a faux ebony handle, and TWO BARS of frothy shaving bliss (of your choosing).

Each bar is 3” wide and just over 1” deep weighing 4 ounces or more. As with all handcrafted artisan soaps, there may be some variation in color and slight irregularities in shape. This is a result of being cut and trimmed by human hands rather than by a machine If you find that your soap “sweats” when left out, don’t be alarmed. It’s simply the natural glycerin in the soap attracting moisture from the air.

If you need some tips on how to build great shaving lather, read our blog post on the topic!

Seattle Sundries is known for its Backwoods Soap, Pottymouth Soap and Sasquatch Soap that's rumored to help "tame the smelly beast in all of us." Her bars were also featured on Pioneer Woman's blog a while back (if you want to see 8 billion close up photos of the soap :).

You can even work with Anne to create your own custom soap with private label, which makes for a great holiday gift as well. Hmmmm... maybe I should have her work on a "Clean your Duker" soap to give out to everyone for the holidays this year.

Anyway, if you are interested in being entered in the Shaving Gift Set Giveaway, to be chosen by the random number generator, add your name to the comments of this post and let me know which soap from her site you would like to try. I think they are all fantastic, so it's going to be hard to choose! You have until midnight Saturday PST, December 4th to enter. Good luck!

Thursday, December 11, 2008

Caramel covered homemade marshmallows

Williams Sonoma versionFollowing the theme of recreating Williams Sonoma food gift ideas, I wanted to share with you our latest knock-off. It's the caramel covered marshmallow treat. Also called Modjeskas, these candies were purportedly named after a beautiful Polish actress by an admirer. Shouldn't they be called Pavell's instead?

Anyway, they look a heck of a lot more complicated to make than they actually are. These make great gifts wrapped in wax paper. Especially when you aren't paying $27 a pound for them!

To make the marshmallows:

Ingredients
1 cup confectioners' sugar
2 tablespoons plus 2 1/2 teaspoons unflavored gelatin
1/2 cup cold water
2 cups granulated sugar
1/2 cup light corn syrup
1/2 cup hot water (about 115 degrees)
1/4 teaspoon salt
2 large egg whites
1 teaspoon vanilla

Directions
Oil bottom and sides of a 13 by 9 by 2-inch rectangular metal baking pan and dust bottom and sides with some confectioners' sugar.

In bowl of standing electric mixer, sprinkle gelatin over cold water and let stand to soften.

In a 3-quart heavy saucepan cook granulated sugar, corn syrup, hot water, and salt over low heat, stirring with a wooden spoon, until sugar is dissolved. Increase heat to moderate and boil mixture, without stirring, until a candy or digital thermometer registers 240 degrees, about 12 minutes. Remove pan from heat and pour sugar mixture over gelatin mixture, stirring until gelatin is dissolved.

With standing mixer beat on high speed until white, thick and nearly tripled in volume, about 6 minutes. In a large bowl with cleaned beaters beat whites (or reconstituted powdered whites) until they just hold stiff peaks. Beat whites and vanilla into sugar mixture until just combined. Pour mixture into baking pan and sift 1/4 cup confectioners' sugar evenly over top. Chill marshmallow, uncovered, until firm, at least three hours, and up to 1 day.

Run a thin knife around edges of pan and invert pan onto large cutting board. Lifting up 1 corner of inverted pan, with fingers loosen marshmallow and let drop onto cutting board. With a large knife trim edges of marshmallow and cut marshmallows into roughly 1-inch cubes. Sift remaining confectioners' sugar into a large bowl and add marshmallows in batches, tossing to evenly coat. Marshmallows (without caramel) keep in an airtight container at cool room temperature for 1 week.

To make the caramel:

Ingredients
1 cup sugar
1 cup light corn syrup
1/2 cup cream
1/4 cup water
1 tbsp butter
1 tsp vanilla extract
1/8 tsp salt
16 marshmallows (see recipe above)
Wax paper

Directions
Cut the wax paper into 2 inch x 3 inch wide strips. You may need to adjust the size of your wax paper depending on how big your marshmallows are.

Place the sugar, water, cream, and corn syrup in a small saucepan over medium heat, stirring constantly until the sugar dissolves. Stir in the butter until it is melted. Continue to cook, stirring occasionally until the caramel reaches 238 degrees, then remove from the heat.

Stir in the vanilla and salt. Allow the caramel to thicken and cool for 10-15 minutes until it cools to about 175 degrees.

To dip the marshmallows:

Using a fork, drop a marshmallow into the caramel and turn it over until it is completely covered. Remove the marshmallow from the caramel, letting excess caramel drip off. Place the marshmallow on a piece of wax paper.

Continue dipping with the remaining marshmallows. If the caramel becomes too stiff, place it over the heat for a minute or two until it becomes easy to work with.

Allow the candies to set fully at room temperature before wrapping. Store excess candies in an airtight container at room temperature.

Related posts:
Chocolate peppermint bark
Holiday gift basket
White chocolate raspberry jam

Repurposing wool into critters

Wool crittersDo you have some old wool sweaters or skirts you don't know what to do with? How about some pillows that you'd like to recycle but don't know how?

Well, here's a craft project that takes that wool and pillow stuffing and makes some super cute stuffed animals to give as gifts.

Now, I really can't stand Martha Stewart for a variety of reasons, but I have to admit, she does some cool stuff. Basically, for this project, all you need to do is felt the wool you are going to use (essentially washing it in hot water - 100% wool works best) and cut out the pieces based on the templates from the website. You then stitch the pieces together, stuff with your old pillow polyester filling or other batting and you are done!

Another fun idea is to make mini Christmas ornaments out of the templates by shrinking the templates down to a smaller size before you print them. You'll most likely have to handstitch the critters since they'll be so small, but think of the fun menagerie you'll have on the tree! Just don't forget to stitch in a ribbon for hanging. You can also attach the mini ornaments to gifts to help share the repurposing love.

If you don't feel like giving these barnyard friends away, they can easily double as pincushions (especially the pig). Just size them accordingly when you print out the patterns. Finally, if you have kitties, you can also make these critters mini sized and fill them with catnip to keep your furry felines happy for the holidays.

Sunday, December 7, 2008

Crunchy's holiday gift basket

Okay, since I'm actually busy this weekend trying to squeeze in making all the handmade things that will go into the holiday gift baskets I'm giving away for Christmas (nothing like waiting until the last minute!), I don't have time to write a super thoughtful post for today.

So, instead, I'm going to tell you what's going into the gift baskets. I'm including links for how to make the items yourself if you want to know how I'm doing them:

1. Peppermint bark
2. Spiced nuts
3. Homemade, dried pasta (if I have time)
4. White chocolate raspberry jam with coffee liqueur

5. Candy cane sugar scrub
6. Piña colada whipped body butter
7. Silk lavender eye mask

I had so much lavender that I dried from the garden over the summer that I really wanted to make something to give away. I'm not sure if I'll get around to making the sleepy eyes on them, but it's a cute idea.

I'm trying to go for a mix of things that will appeal to both genders (food for the guys and pampering for the gals). I still have a few things left over from last year (like microwaveable rice bags and bath scrubbies that I knit) that will go into gift bags for those who didn't get them last year.

I'll also be including a cheat sheet with the gifts to explain how to use certain items and include ingredients instead of trying to write individual tags for them. Call me lazy, but I think it will be easier and I can spend my energy on the gifts themselves instead.

By the way, for the Candy cane sugar scrub I ended up doing colored layers rather than a swirl since it was much easier that way.

Friday, December 5, 2008

Candy cane themed holiday gift ideas

As promised, here are a few easy to make homemade holiday gift giving ideas. I've included one food item and one beauty care item in case you prefer one or both!

Layered peppermint barkI suspect I'm not the only one being bombarded by Williams Sonoma and Crate and Barrel catalogs all sporting delicious tins of chocolate peppermint bark. I've had the stuff from Williams Sonoma and it's mighty tasty, but for about $30 a pound, I knew I could do much better (Crate and Barrel's is something like $15 for 14 ounces).

So, even with using high quality Callebaut chocolate (on sale this week in the Seattle area at Town and Country Markets for $4.99 a pound) it's much, much cheaper to make it yourself.

Peppermint Bark

Ingredients

16 ounces bittersweet or semisweet chocolate, chopped
12 ounces high quality white chocolate, chopped
6 candy canes, coarsely crushed (about 6 ounces)
1/2 teaspoon peppermint extract

Instructions
Line a large cookie sheet with parchment paper or foil.

Melt bittersweet chocolate in double boiler until it is melted and smooth. Stir in peppermint extract. Cool to barely lukewarm, about 5 minutes. Pour bittersweet chocolate mixture onto cookie sheet. Using a spatula, spread the chocolate so that it is about 1/4 inch thick. Chill for about 15 minutes or until it is set.

Meanwhile, melt the white chocolate in a double boiler until it is melted and smooth. Cool until it is barely lukewarm (about 5 minutes). Pour the white chocolate onto the cooled bittersweet chocolate, using a spatula to spread out the chocolate to cover the first layer evenly.

Immediately sprinkle top layer with crushed candy canes. Let it sit for about 10 minutes and then chill just until firm, about 20 minutes. It can be broken apart or cut into rectangles. Store in an airtight container in a cool place or freeze. Allow it to come to room temperature before serving.

You can pack the bark in glass jars that are decorated with red ribbon and candy canes for a sweet touch.

Candy Cane Sugar Scrub

Crushed candy canes are really just sugar right? So, why not add them to a sugar scrub to make a super festive beauty treat?

Ingredients
1 cup granulated white sugar
6 candy canes, finely crushed almost into a powder
1/2 cup sweet almond oil (or olive oil)
1/2 teaspoon vitamin E oil (optional - used as a preservative)
1 teaspoon cocoa butter (optional)
6 drops peppermint essential oil

Instructions
Mix all ingredients until well blended. Place into a clean glass jar with a tight lid and add a fancy label. I highly recommend the 1/2 pint wide mouth canning jars and wide mouth plastic storage lids.

Thursday, December 4, 2008

Handmade holiday gifts

Over on Simple, Green, Frugal Coop they've been discussing lately about what they would like to give away as handmade holiday gifts. Heather did a bang up job with her Homemade Laundry Soap gift bags (run, don't walk, to steal this great gift idea). It looked a little complicated to me, but I'm still wary of making your own laundry soap and using it in a front loading, low-water washer. I really don't want to break my overpriced piece of equipment, but I'm in love with her gift bags.

Paul's starterPaul, God love him, also presented something that, in theory is a fantastic gift, but in practice, comes off a little creepy. His Homemade Sourdough Starter would, frankly, scare the crap out of any recipient I know. I can only imagine their surprise when they open up this gift and discover a jarred frothy swish of Paul's, um, starter.

Now if you read his post you will find that he started it from packaged yeast and its been fermenting a long time, most likely intermingling with wild yeast native to where he lives, but how do you explain this gift?

"Hey, yeah, no, let me explain. My husband's been working on collecting that for about a year and a half now and we wanted to share it with you. No, really, he says that it 'only tastes better with age!'. I hope you like it."

Okay, Paul, I sure as hell hope you have a good sense of humor. You know mine is two steps left of disgusting. Anyway, if I had the huevos, I think it would be great to pass these out, adding a little gift tag with the origins of the starter yeast:

This sourdough starter has been in our family for over 25 years. The original yeast was collected from the unwashed stomach folds of my 350 pound grandmother during one of the hottest summers in Mississippi right before she passed away. It is considered a family heirloom and I'm glad to share it with you. Each time you bake using this starter, I hope it reminds you of my grandmother's good cooking.

Alrighty then. Congratulations if you made it this far. Tomorrow, I swear that I'll share with you the recipe for an easy homemade holiday gift.

In the meantime, what's your favorite handmade gift to give away?