Blog Update!
For those of you not following me on Facebook, as of the Summer of 2019 I've moved to Central WA, to a tiny mountain town of less than 1,000 people.

I will be covering my exploits here in the Cascades, as I try to further reduce my impact on the environment. With the same attitude, just at a higher altitude!
Showing posts with label homemade. Show all posts

Wednesday, April 27, 2011

Merino blanket - The 10 year project

Since the weather has been getting warmer, we've been waking up way too hot under our down comforter and have since switched over to lighter blankets. During this transition, we oftentimes wake up freezing, so I use a merino throw on my side of the bed that I made a while ago. But it is still a work in progress.

I just realized that I started this blanket when we lived at our old house. I had finished it as a throw when I decided I wished I had made it wider. That was over 7 years ago. Instead of starting something new I concocted a plan to widen it by knitting side panels that I would then "sew" onto the main panel using yarn (see photo below for a close up shot). I finished one of the side panels a few years ago and have been slowly making my way in fits and starts on the second.

Right now (with the main and one side panel done) it covers my side of the bed and then some. When I'm done, it probably still won't be big enough to fit all the way across our queen bed but, then again, my husband would find it too warm anyway. I figure, at this rate, I'll finish it in about 10 years time. But, I don't mind. Like my daughter's hand sewn quilt, I'm glad I took the time to make it, because it will be something that I'll keep forever and torture future generations with.

I'm also glad I spent the money on the yarn I bought because I'd hate to spend all those hours on something not as heavenly. The yarn I'm using is Crystal Palace Merino Frappe. It's 80% extra fine merino wool with 20% nylon that is brushed so it's very light, extremely soft and very warm. Emma loves to curl up in it and so do I.

Do you have a project that you've been working on for years?

Sunday, December 5, 2010

Caramel covered homemade marshmallows

Williams Sonoma versionFollowing the theme of recreating Williams Sonoma food gift ideas, I wanted to share with you another knock-off. It's the caramel covered marshmallow treat. Also called Modjeskas, these candies were purportedly named after a beautiful Polish actress by an admirer.

Anyway, they look a heck of a lot more complicated to make than they actually are. These make great gifts wrapped in wax paper. Especially when you aren't paying $27 a pound for them!

To make the marshmallows:

Ingredients
1 cup confectioners' sugar
2 tablespoons plus 2 1/2 teaspoons unflavored gelatin
1/2 cup cold water
2 cups granulated sugar
1/2 cup light corn syrup
1/2 cup hot water (about 115 degrees)
1/4 teaspoon salt
2 large egg whites
1 teaspoon vanilla

Directions
Oil bottom and sides of a 13 by 9 by 2-inch rectangular metal baking pan and dust bottom and sides with some confectioners' sugar.

In bowl of standing electric mixer, sprinkle gelatin over cold water and let stand to soften.

In a 3-quart heavy saucepan cook granulated sugar, corn syrup, hot water, and salt over low heat, stirring with a wooden spoon, until sugar is dissolved. Increase heat to moderate and boil mixture, without stirring, until a candy or digital thermometer registers 240 degrees, about 12 minutes. Remove pan from heat and pour sugar mixture over gelatin mixture, stirring until gelatin is dissolved.

With standing mixer beat on high speed until white, thick and nearly tripled in volume, about 6 minutes. In a large bowl with cleaned beaters beat whites (or reconstituted powdered whites) until they just hold stiff peaks. Beat whites and vanilla into sugar mixture until just combined. Pour mixture into baking pan and sift 1/4 cup confectioners' sugar evenly over top. Chill marshmallow, uncovered, until firm, at least three hours, and up to 1 day.

Run a thin knife around edges of pan and invert pan onto large cutting board. Lifting up 1 corner of inverted pan, with fingers loosen marshmallow and let drop onto cutting board. With a large knife trim edges of marshmallow and cut marshmallows into roughly 1-inch cubes. Sift remaining confectioners' sugar into a large bowl and add marshmallows in batches, tossing to evenly coat. Marshmallows (without caramel) keep in an airtight container at cool room temperature for 1 week.

To make the caramel:

Ingredients
1 cup sugar
1 cup light corn syrup
1/2 cup cream
1/4 cup water
1 tbsp butter
1 tsp vanilla extract
1/8 tsp salt
16 marshmallows (see recipe above)
Wax paper

Directions
Cut the wax paper into 2 inch x 3 inch wide strips. You may need to adjust the size of your wax paper depending on how big your marshmallows are.

Place the sugar, water, cream, and corn syrup in a small saucepan over medium heat, stirring constantly until the sugar dissolves. Stir in the butter until it is melted. Continue to cook, stirring occasionally until the caramel reaches 238 degrees, then remove from the heat.

Stir in the vanilla and salt. Allow the caramel to thicken and cool for 10-15 minutes until it cools to about 175 degrees.

To dip the marshmallows:

Using a fork, drop a marshmallow into the caramel and turn it over until it is completely covered. Remove the marshmallow from the caramel, letting excess caramel drip off. Place the marshmallow on a piece of wax paper.

Continue dipping with the remaining marshmallows. If the caramel becomes too stiff, place it over the heat for a minute or two until it becomes easy to work with.

Allow the candies to set fully at room temperature before wrapping. Store excess candies in an airtight container at room temperature.

Related posts:
Chocolate peppermint bark
Holiday gift basket
White chocolate raspberry jam

Friday, December 3, 2010

Chocolate covered candied orange peels

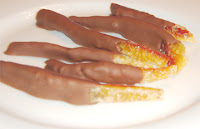
Chocolate dipped candied orange peelsI wrote up this recipe almost three years ago and made some for holiday presents and I still have people asking me to make some more. I better get on it this year...

You can modify this recipe to make more or less. This year, since I'm all about non-toxic ingredients, I've edited it a tad, but if you can't find organic chocolate or sugar to your liking then do what you can.

Ingredients:
Peels from 5 medium size organic oranges
4 cups granulated organic sugar
2.5 cups filtered water
6 oz organic, fair trade chocolate (milk or dark or white or mix it up)

The process is fairly easy.

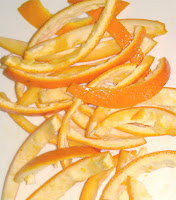
Step 1. Scrape the inside of the orange peels to remove the residual orange from the pith. If the pith is really thick, scrape it out with a vegetable peeler or a knife.

Step 1

Step 2. Cut the peels into strips about 1/4" in width, removing the parts where the stem and the orange end are and any parts that don't look good.

Step 2

Step 3. Put the strips into a medium sauce pan and cover with cold water. Bring the water to a boil to blanch the peels. This helps remove the bitterness of the pith. Repeat the blanching process one more time (if you removed a lot of the pith) or two more times if you left a lot of the pith on (like I did).

Step 3

Step 4. Drain the peels and rinse with cold water. In the same saucepan add the water and sugar and bring to a boil. It will start to boil somewhere around 210 degrees F.

Step 4

Step 5. Once the sugar syrup is boiling, add the peels and bring the temperature back up to boiling. Simmer the peels on medium low until they become translucent. Depending on how much pith is on the peel this will take anywhere from 1/2 an hour to 1 hour and 15 minutes (this is how long it took mine).

Step 5

Step 6. When the peels are looking translucent, use a pair of tongs and remove them from the pot, placing them on a rack set over a cookie sheet to catch the drips. If you want you can roll the freshly removed strips in additional sugar but I found this to be a huge mess.

[You can strain the sugar syrup and use it as a simple syrup in a variety of recipes - just make sure you refrigerate it.]

Step 6

Step 7. Leave the peels out to dry. If you want to speed things up you can put the whole cookie tray/rack combo in the oven at 250 degrees F for an hour or two (just skip the non-stick!).

Step 8. If you want to dip the strips in chocolate, melt the chocolate over a double boiler and dip, laying the strips down on parchment paper to dry.

Step 8

Friday, August 27, 2010

Radical homemakers

The San Francisco Chronicle recently ran the article, Radical homemakers reclaim the simple life, describing how women are stepping off the professional track and going back to homemaking. But, not in a 1950s way. More like an 1850s way which include subsistence farming, food preservation, bartering and frugal living.

These women are staying home to raise not only their children, but chickens, and grow gardens, can food and make their own soap. In other words, "shunning consumer culture in favor of a life of complete and utter domesticity." You know, the stuff many of us have been doing for years. With or without a job in the formal economy.

However, is it really radical? I would consider many of these activities to be non-mainstream (albeit popularity is on the rise), but not exactly radical. For many, I think they see doing these things more like a hobby. I'm sure the same could be claimed for men who are interested in cooking (a la the Food Network) or DIY automotive work (a la MOTORZ.tv). But, that's not considered radical.

First of all, do you need to quit your job to be a homemaker? Particularly in light of the fact that the women featured in this article all had some other source of income either through writing, their farm business, soap business or, in one case, a full-time teaching gig?

And, furthermore, is there anything radical about what we do?

Photo credit: Robin Johnson Simpson making soap in her kitchen, courtesy of The Chronicle.

Tuesday, May 25, 2010

Homemade diaper cream

I've been doing a lot of spring cleaning around the house lately (which is why I haven't been posting much the last few days) and, while I was going through some of our cabinets, I noticed that I had a few tubes of diaper cream lurking around from ages ago. That's right, a couple of Desitin tubes were still making their presence known even though it's been years since they've seen daylight.

Aside from the nasty smell, I wondered what ingredients I was subjecting the sensitive nether regions of my children to when they were babies. The more offensive ingredients included petroleum based ingredients as well as a variety of parabens, which are used as preservatives, but are known endocrine disruptors. At the time, I didn't know any different, but I wouldn't want to use it now.

So, what's a parent with a sensitive baby bottom to do? Well, you can make your own cream. Here's a recipe based on the one I found in the book, Do It Gorgeously: How to Make Less Toxic, Less Expensive, and More Beautiful Products.

Homemade Diaper Cream
2 tablespoons organic olive oil
2 tablespoons castor oil
1 teaspoon beeswax
1/2 teaspoon Vitamin E oil
1 teaspoon zinc oxide*
5-10 drops lavender essential oil

Makes approximately 2 ounces

Gently heat the oils and the beeswax in a small bowl set over a pan of boiling water. When the wax has melted, remove from the heat. Let cool 5 minutes and then add Vitamin E, zinc oxide and essential oil. Pour into glass jar and refrigerate to solidify. Store in a dark, cool spot (1 month shelf life; 3 months in the fridge).

*You can find zinc oxide from Essential Depot at Amazon.com.

Saturday, January 9, 2010

Making goat butter

With hobby and backyard goat keeping on the rise, I was wondering this morning whether or not you could easily make goat butter with goat milk. Nigerian dwarf goats can deliver up to two quarts of milk a day, so what better use of all that milk (besides making cheese, of course), but to try to make goat butter?

Well, it turns out that goat butter, although different in taste from cow's milk based butter, is totally possible for someone who raises goats. The butter produced is perfectly white (since there is a lower amount of Vitamin A in goat's milk versus cow's) and has a lower melting point given the higher percentage of unsaturated fatty acids.

How does making goat butter differ from making butter from cow's milk? Well, really, all you need differently is a cream separator for larger volumes and, if you don't want to spring the money for this expensive piece of equipment, you can read about how to separate it manually here. If you don't have enough cream initially to make butter, just freeze what you do get off, cream-wise, until you have enough. One quart of cream makes a pound of butter.

So, once you have enough cream stored up, head on over here for instructions on how to turn it into butter - the method is the same. The resulting butter is (from what I've read) creamy, mild, and not "goaty" tasting. Store your butter in the fridge or, for the long-term, freeze it for up to six months.

I'm not sure how possible it is if you are relying on homogenized goats milk from the store, since it would be too difficult to separate the cream, but if you want to try and report back, by all means, go for it!

Any of you out there ever made goat butter?

Friday, May 15, 2009

Preventing ingrown hairs naturally

If you shave, wax or otherwise remove hair from your body and suffer from bumps, ingrown hairs and the like, it can be extremely annoying. Not to mention painful and very unsightly. There are a number of products on the market that purportedly help prevent or reduce skin irritation and ingrown hairs but they tend to be expensive. They work fairly well but the cost can be prohibitive. If you are African American or have very curly hair, ingrown hairs can be a considerable headache.

I've just started using Whish Flawless Ingrown Hair Serum, but at $22.50 for 1.1 ounces, unless it works miraculously I'm not sure it's a habit I can keep up. Another very popular product is called Tend Skin which is cheaper at $20 for 4 ounces, but many find it to be too harsh.

So, what's a bumpy girl (or boy) to do? Well, I found a recipe for making your own version of Tend Skin, which consists basically of Isopropyl (rubbing) alcohol, witch hazel, purified water and uncoated aspirin, which are similar to the main ingredients in Tend Skin. It sounds like you can skip the witch hazel and water in the mixture, if you want to keep it simple. The beauty of making it yourself is that if you find the original formula to be too harsh, you can dilute it by reducing the alcohol and/or aspirin and increasing the water.

Anyway, the cost is considerably less to make it yourself so it's definitely worth a try even if it doesn't work out for you. Here's the basic recipe:

5 oz Isopropyl alcohol
15 uncoated aspirin

Add the ingredients to a squeeze bottle and shake to mix. You'll need to shake before use as some settling may occur. Apply with a cotton pad or cloth after shaving or showering or however often is needed. And, remember to exfoliate several times a week and moisturize to help prevent ingrowns.

Related posts:
Sustainable hair removal
Homemade clay mask
Hand rescue cream